Instructor Notes — Week 11
Theme: Ultrasonic sensors & echolocation
Focus Concept: Ultrasonic distance sensing, mapping & constrain, MakeCode extensions
Mini‑Project: Echolocation Beeper (closer = faster beeps, farther = slower beeps)
Learning Objectives
By the end of this session, participants should be able to:
- Explain, in simple terms, how an ultrasonic sensor measures distance using sound and echoes.
- Describe the roles of the TRIG and ECHO pins and why ECHO HIGH time is linked to distance.
- Use a MakeCode extension block to read a distance value in centimetres.
- Use Math.map to convert a distance range into a delay range.
- Use Math.constrain to keep sensor values inside safe, predictable bounds.
- Build and test an echolocation beeper whose beeping speed and LED brightness change with distance.
Key Vocabulary
- Echolocation — finding where things are by sending sound and listening for the echo.
- Ultrasonic sensor — an input device that sends high-frequency sound and listens for the reflection.
- TRIG / ECHO — the pins used to send the pulse (TRIG) and receive the echo (ECHO).
- Extension — an add-on pack in MakeCode that gives extra blocks for special hardware.
- Mapping — converting a number from one range into another (e.g. 10–300 → 100–1000).
- Constrain — keeping a value inside a chosen minimum and maximum range.
- Input device — something that gives the micro:bit information.
- Output — something the micro:bit does (sound, light, messages).
- Transducer — a device that converts one type of energy into another (e.g., electrical energy into sound waves, or sound waves back into electrical signals).
Session Flow (≈ 80 min)
- Starter & Context (10 min) — echolocation in animals (bats, dolphins) and sonar in technology.
- Part A – Raw Ultrasonic Demo (20–25 min) — wire TRIG/ECHO on P0/P1, show raw distance, explain TRIG/ECHO and the “÷ 58” maths.
- Part B – Extension + Mapping Project (35–40 min) — move to P13/P14, add extension, use mapping + constrain to build the echolocation beeper with a simple LED visual.
- Reflection & Extensions (5–10 min) — connect back to previous weeks (inputs/outputs, loops, conditions) and discuss real‑world uses.
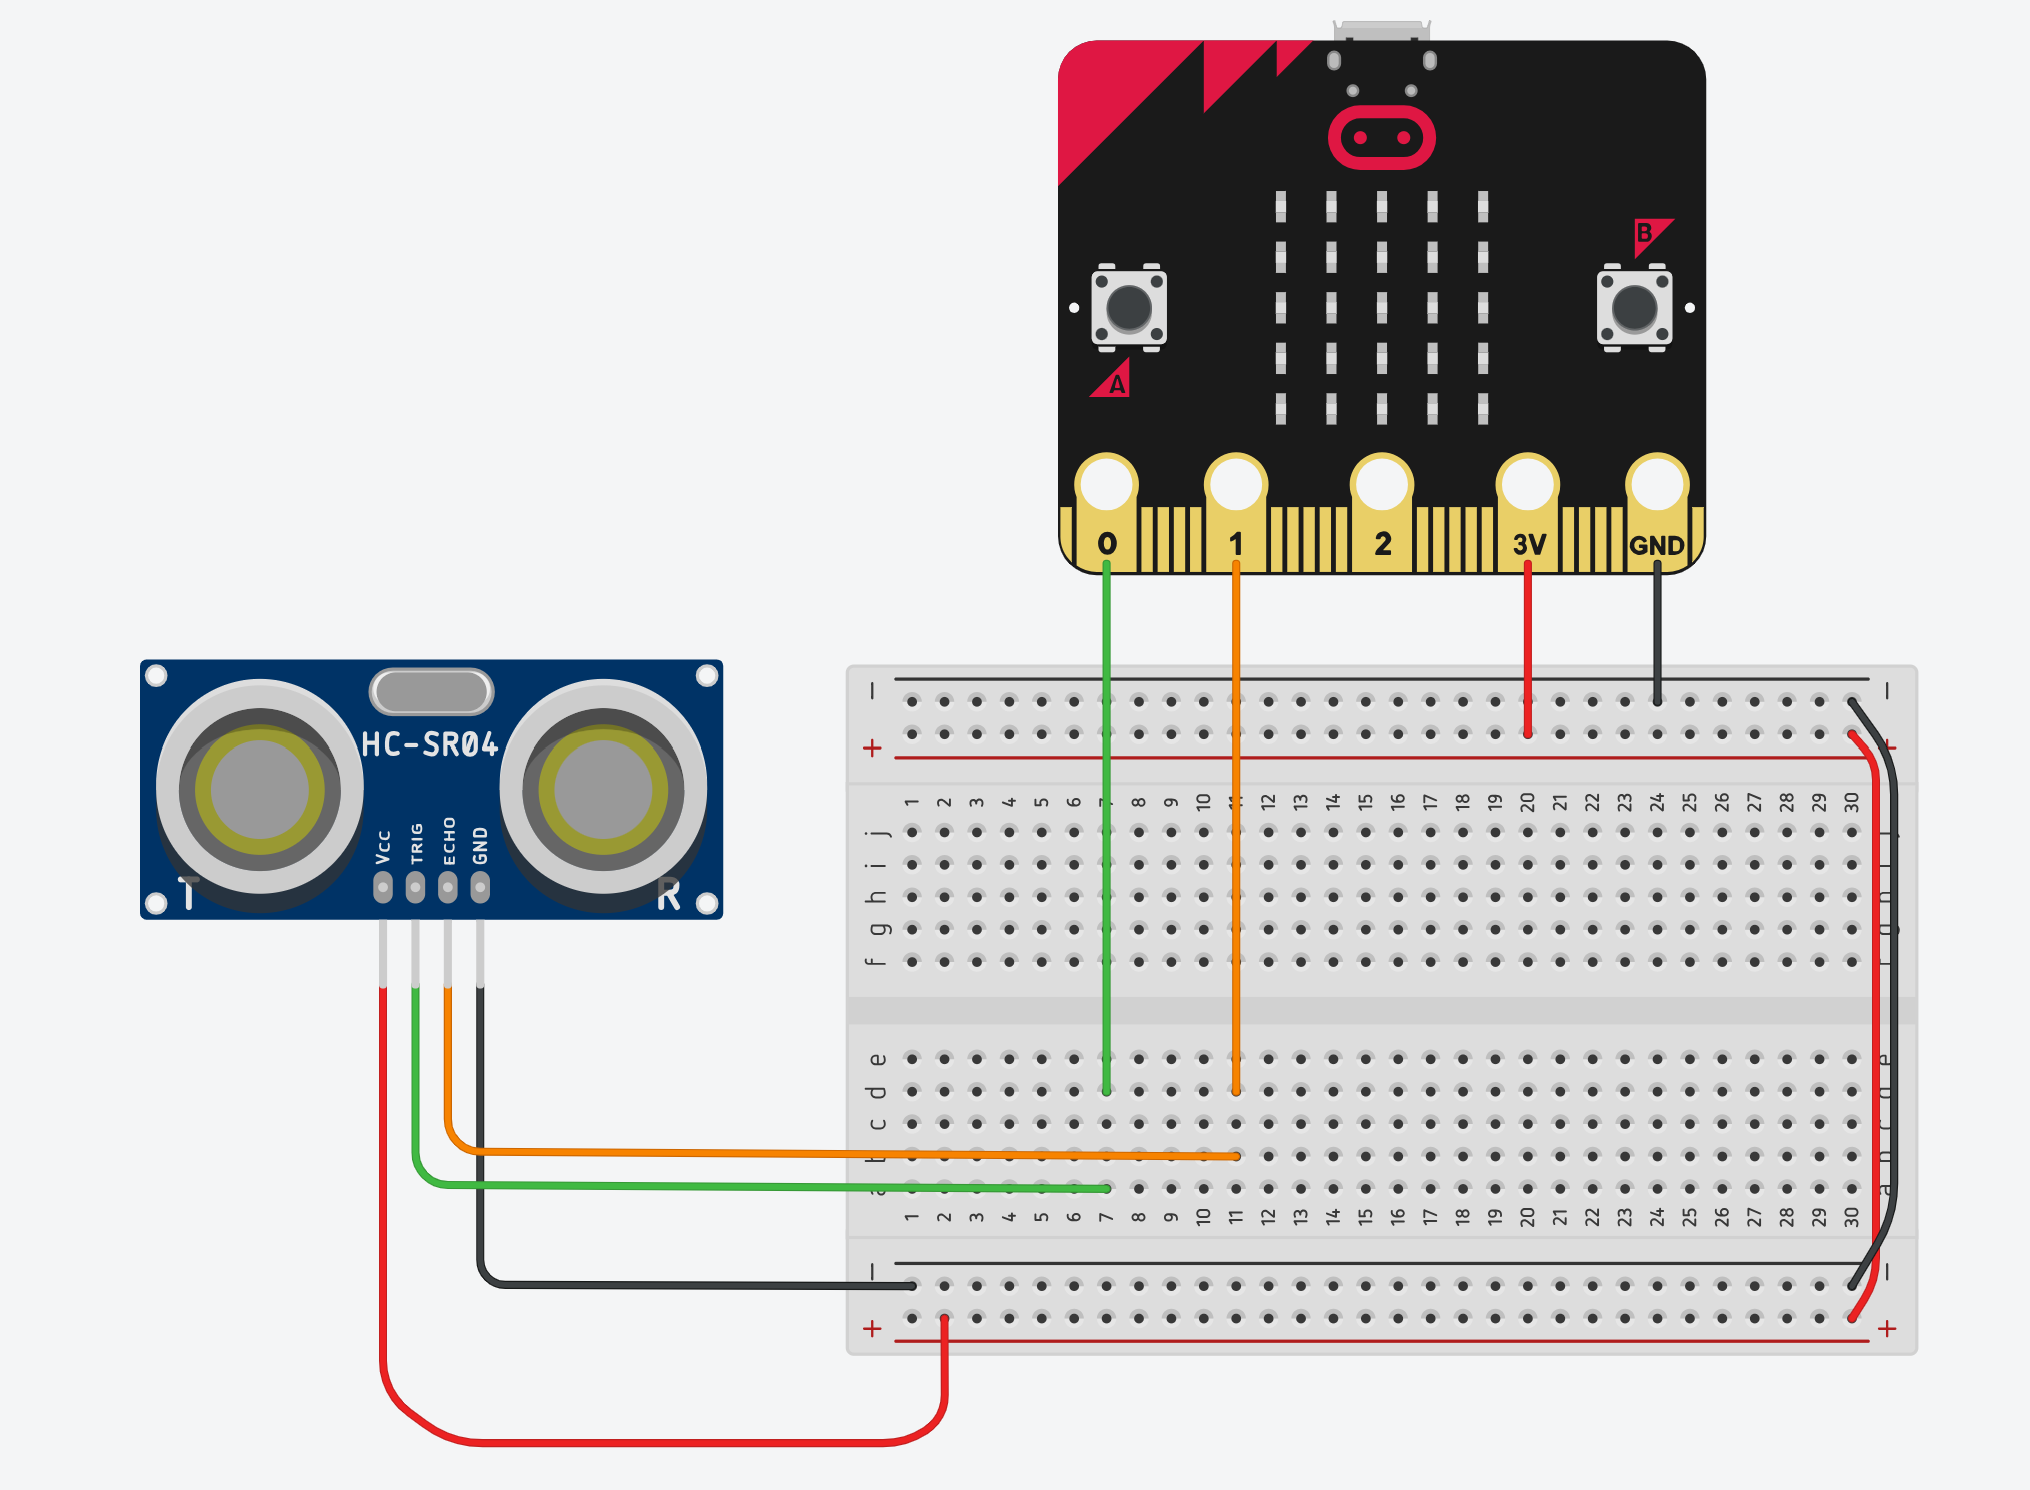
Part A – Raw Ultrasonic Distance Demo (P0/P1)
Aim
Give children an intuitive understanding of what the ultrasonic sensor actually measures before hiding the details inside an extension. They should see a live number on the display that changes as they move their hand or an object.
Short demo project:
- Raw Distance Meter — manual TRIG/ECHO control; show distance on LEDs.
Conceptual Focus
- The ultrasonic sensor has two main signals:
- TRIG — a short command pulse from the micro:bit to the sensor.
- ECHO — a longer pulse from the sensor back to the micro:bit that encodes the time taken by the echo.
- The micro:bit never sets ECHO HIGH — the sensor’s own microcontroller does that.
- The time that ECHO stays HIGH is proportional to the round‑trip time of the sound wave.
- Dividing the measured time in microseconds by 58 converts it into distance in centimetres.
TTC Pseudocode (Raw Demo)
WHEN start DO
    REPEAT FOREVER
        # 1. Send a short trigger pulse on P0
        SET pin_P0 TO LOW
        WAIT 2 microseconds
        SET pin_P0 TO HIGH
        WAIT 10 microseconds
        SET pin_P0 TO LOW

        # 2. Measure echo time on P1 (HIGH pulse length in microseconds)
        SET echo_time_us TO [pulse length on pin P1 while HIGH]

        # 3. Convert time to distance in centimetres
        SET distance_cm TO echo_time_us / 58

        # 4. Filter out invalid or very large readings
        IF distance_cm <= 0 OR distance_cm > 200 THEN
            SET distance_cm TO 0
        END IF

        # 5. Show the distance on the display
        SHOW NUMBER distance_cm

        PAUSE 50 ms
    END REPEAT
END WHEN
You do not need children to type this pseudocode; it is for your reference when explaining the blocks.
Blocks version (MakeCode — Raw Demo)
Teaching Notes (Part A)
How to introduce the sensor
- Show the ultrasonic sensor and ask learners what they think the two “eyes” do.
Explain:- One side sends ultrasonic pulses (like a bat’s squeak).
- The other side listens for the echo.
- Link back to science:
“Bats, dolphins and submarines all use sound and echoes to figure out how far things are.
Our sensor does the same, but it tells the micro:bit using electrical pulses.”
Explaining TRIG vs ECHO (core idea)
You can use this framing:
“Our micro:bit only tells the sensor when to start measuring.
The sensor decides how long the echo took and reports that back to us.”
Internal sequence:
- micro:bit sends a 10 µs TRIG pulse on P0.
- The sensor’s own microcontroller:
- sends 8 ultrasonic pulses,
- listens for the echo.
- When it hears the echo, the sensor raises ECHO HIGH on P1.
- ECHO stays HIGH for the entire round‑trip time of the sound.
- When the echo is fully received (or a timeout happens), the sensor pulls ECHO LOW.
pulseIn()on the micro:bit measures how long ECHO was HIGH.
Emphasise:
- You never set P1 HIGH in your code.
- The sensor drives ECHO; the micro:bit only measures it.
Sensor wiring
Explaining the “divide by 58” maths
Provide this as background for yourself (you don’t need to go through every step with the youngest learners):
- Speed of sound ≈ 343 m/s in air.
-
Convert to cm per microsecond:
- 343 m/s = 34,300 cm/s
- 34,300 cm / 1,000,000 µs ≈ 0.0343 cm/µs
-
The time measured is for there and back, so divide by 2:
- 0.0343 / 2 ≈ 0.01715 cm/µs
-
To get distance from time, we invert that number:
- 1 / 0.01715 ≈ 58.3
-
Rounding to 58 gives the familiar formula:
distance (cm) ≈ echo_time (µs) ÷ 58
You can summarise it for learners as:
“Inside the code there is a bit of physics: we use the speed of sound to turn time into distance.
The ‘divide by 58’ is just the maths that does that conversion for us.”
Practical tips for the demo
- Have one micro:bit + sensor set up on the projector for everyone to see.
- Ask volunteers to move their hand closer/further and watch the number change.
- Try different objects:
- flat book (good reflection),
- sleeve / jumper (poor reflection),
- angled objects to show that echoes can “miss” the sensor.
- If the reading sticks at 0:
- check power (3V and GND),
- check TRIG/ECHO wires,
- ensure P0 and P1 are correctly chosen in the blocks.
Part B – Extension, Mapping & Constrain (P13/P14)
Aim
Build a more readable, more “product‑like” project using a MakeCode extension and introduce Math.map and Math.constrain as tools for turning sensor values into behaviour.
Main project:
- Echolocation Beeper — a beeper that chirps faster when an object is close and slower when it is far away, with a simple LED brightness visual.
Conceptual Focus
- An extension in MakeCode is an add‑on pack that provides extra blocks, often for specific hardware.
- The extension hides the raw TRIG/ECHO timing code and gives us a clean “distance (cm)” block.
- Mapping lets us convert a distance range into a delay range:
- e.g. 10–300 cm → 100–1000 ms.
- Constrain keeps noisy sensor values inside a safe band before we map them, so the behaviour is stable.
TTC Pseudocode (Extension Project)
WHEN start DO
    # Connect ultrasonic sensor using extension
    # (we choose P13 for TRIG and P14 for ECHO to show that
    #  sensors do not have to use P0 and P1)
    CONNECT ultrasonic_sensor_trig_P13_echo_P14
END WHEN


WHEN start DO
    REPEAT FOREVER
        # 1. Read distance from the extension (already in cm)
        SET distance_cm TO [ultrasonic distance in cm from extension]

        # 2. Keep distance in a safe range (10–300 cm)
        SET distance_cm TO CONSTRAIN distance_cm BETWEEN 10 AND 300

        # 3. Map distance to a delay:
        #    close (10 cm) → short pause (100 ms)
        #    far   (300 cm) → long pause (1000 ms)
        SET delay_ms TO MAP distance_cm
            FROM 10 TO 300
            INTO 100 TO 1000

        # 4. Simple visual: LED brightness based on delay
        #    (inverse mapping: shorter delay → brighter LEDs)
        SET brightness TO MAP delay_ms
            FROM 1000 TO 100
            INTO 10 TO 255
        SET LED BRIGHTNESS TO brightness
        SHOW ICON "small diamond"

        # 5. Play a short chirp
        PLAY TONE 988 Hz FOR 100 ms

        # 6. Wait for delay_ms before repeating
        PAUSE delay_ms
    END REPEAT
END WHEN
Again, this pseudocode is for your guidance; children will build it using blocks.
Blocks version (MakeCode — Echolocation Beeper)
Teaching Notes (Part B)
Introducing extensions
Explain extensions in a way that connects to real programming:
“MakeCode has the basic blocks built in: LEDs, buttons, loops, variables.
But when we want to talk to special hardware like this ultrasonic sensor, we can install an extension.
An extension is an extra pack of blocks that someone has written to do the hard work for us.”
Key points:
- Inside the extension, there is code that:
- sends the TRIG pulse,
- measures ECHO with
pulseIn(), - applies the “÷ 58” maths,
- handles noise and timeouts.
-
We don’t have to write that again; we just use a single block like:
[ultrasonic distance (cm) trig P13 echo P14] - This mirrors how professional programmers use libraries to avoid reinventing wheels.
Make it explicit that you are now using P13/P14:
“In the raw demo we used P0 and P1 to make the timing easy to see.
Now, with the extension, we are free to choose different pins.
Today we’re using P13 and P14 to show that sensors do not have to live on P0/P1 — we can configure the pins in the block.”
Explaining mapping
Visual metaphor:
-
Draw two number lines on the board:
- Top: distance_cm from 10 → 300
- Bottom: delay_ms from 100 → 1000
-
Mark a point on the top line (e.g. 100 cm) and ask where it should land on the bottom line.
Script you can use:
“Mapping connects one number line to another.
If the distance is closer to 10 cm, the delay should be closer to 100 ms (fast beeps).
If the distance is closer to 300 cm, the delay should be closer to 1000 ms (slow beeps).The MAP block does this stretching and shrinking for us automatically.”
Emphasise:
- We choose both input and output ranges:
- 10–300 cm is where our sensor is most useful in class.
- 100–1000 ms is a good human‑friendly beeping range.
Explaining constrain
Key points:
- Real sensors are noisy. Sometimes they produce:
- 0,
- very large numbers,
- or brief spikes.
-
Constrain protects your program from weird input:
“Constrain means: if the value goes below 10, pretend it is 10.
If it goes above 300, pretend it is 300.
Otherwise, leave it alone.”
This ensures that:
- The mapping always receives values in the range it expects.
- Delay and brightness stay in sensible ranges.
- The beeper doesn’t freeze or behave strangely when the sensor glitches.
This is an excellent opportunity to stress a good engineering habit:
“Whenever we read from the outside world, we should check and limit the values before we use them.”
Connecting sound and light
The mapping is reused for brightness (via delay):
- Short delay → bright LED.
- Long delay → dim LED.
You can say:
“We took the distance and turned it into a delay for the beeps.
Now we reuse that delay to set how bright the micro:bit glows.
The closer you get, the brighter it shines and the faster it chirps — just like a bat closing in on something.”
Differentiation ideas
Support
- Provide a partially built project with:
- the extension already added,
- the connect block already placed,
- a simple loop that shows distance as a number.
- Let less‑confident learners focus on:
- adding the
constrain, - adding the
mapfor delay, - adding the beep.
- adding the
Extend
- Allow confident learners to:
- map distance to pitch as well as delay (closer → higher pitch),
- add a simple icon‑based warning (e.g. skull when distance < 15 cm),
- experiment with different mapping ranges and explain what changes.
Common Misconceptions & Fixes
-
“TRIG and ECHO are the same pulse.”
Clarify that TRIG is a fixed 10 µs command from the micro:bit, while ECHO is controlled by the sensor and its HIGH time varies with distance. -
“The micro:bit sets P1 HIGH.”
Emphasise that the sensor drives P1; the micro:bit only measures it withpulseIn(). -
“Mapping automatically clamps out‑of‑range values.”
Point out thatMath.mapwill happily extrapolate beyond the target range if given values outside 10–300; that is whyconstrainis applied first. - “Extensions are magic.”
Reinforce that an extension is just code someone has written to do the detailed work:- It still uses TRIG and ECHO internally.
- It still relies on the speed of sound maths.
- It simply gives us a cleaner interface.
- “Constrain is only for ultrasonic sensors.”
Remind learners that constrain is useful any time we read from the outside world (light level, temperature, joystick values, etc).
Reflection Questions
Use these to close the session or as prompts for discussion next week:
- “In your own words, what does the ultrasonic sensor measure?”
- “What is the difference between TRIG and ECHO?”
- “Why do we divide the echo time by 58 to get distance in centimetres?”
- “Why did we use both mapping and constrain in the echolocation beeper?”
- “How does using an extension change the way our program looks and feels compared to the raw demo?”
- “Where else might it be useful to map one range of values into another in a game or project?”